Round Twelve — Levy’s Bagels
This weekend my grandfather (from my mom’s side) and my grandmother (from my dad’s side) came to visit. For lunch, my grandmother brought two pounds of German deli meat — all some sort of “wurst” — and rye bread for sandwiches, and for dinner made us her household-famous stuffed cabbage, making the house smell so much of warm bacon and sauerkraut I felt as though I was walking through the piping-hot platter itself dressed in a dirndl while simultaneously listening to “yodel-ay-hee-hoo”s in the background. After dinner we played a heated battle-of-the-sexes version of Trivial Pursuit, which only took two and a half hours for the ladies to prevail, and I thought the whole time how wonderful it is to be surrounded by family and home and actually like them, and how things so organic as these are what I love most in life.
This attraction to simplicity permeates into my thoughts about baking as well. I (almost) always refuse to eat dessert if it’s not homemade, and a good chunk of the reason I have been baking bread from scratch is because I am drawn to the idea of taking something so foundational to my daily diet and making it from tangible ingredients that I have personally divided and mixed and kneaded together into an edible (and hopefully delicious) item. I know where it came from and I know of what it is made, and I don’t need any additives or extra stimulants to make it better. Which is why, on any occasion, I would rather play a trivia game at the kitchen table with my 70-something year old grandmother and grandfather than sit on a couch and watch a rerun of “The Office” while eating Ho-Hos (which I would never do anyway, but the principle still stands).

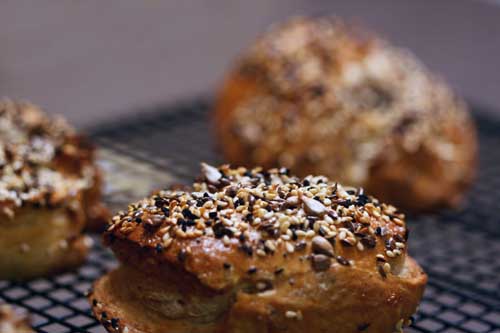
But enough of my rambling. I decided to take a stab at a recipe for a bread I think many of us take for granted when we buy them in those tube bags from the grocery store. When we buy bagels, we forget they are even bread, and we burn them and butter them and slab on top of them so much cream cheese and peanut butter and high fructose corn syrup — I’m sorry, jelly — that they become nothing more than a porous vehicle by which their gooey toppings enter our mouths. I, too, was a follower of this ghastly abomination, but since having bitten into a homemade bagel and undergoing a “bagel awakening,” I doubt I’ll ever go back to eating those oversized, cakey frisbees disguised in bagel form.
The process of making these bagels was — pardon my French — really freaking hard. Leave it to Rose Levy Beranbaum to make what she calls an “easy-to-read” bagel recipe one of the most confusing and particular recipes I’ve ever attempted (no offense, Rose, but you left me feeling quite daft). I added too much flour to the sponge at the start of the recipe, and in order to fix my mistake I opted out of adding flour when mixing the sponge and the starter in the stand mixer. It worked, but, finicky as these bagels were, the process still resulted in a fairly chewy product. The rounded dough also came apart in the boiling process, so I had to put them back together with toothpicks, which, if the eater was not aware, could have resulted in a terrible bagel experience.

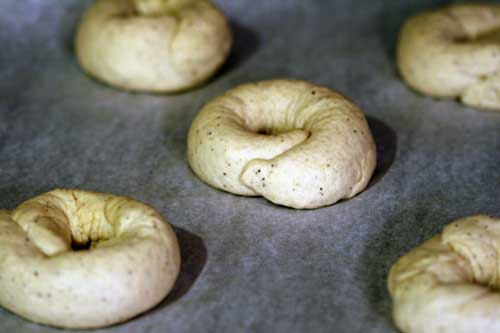
I must say that the “Artisan Bread Topping” from King Arthur Flour (given as a gift from my sister-in-law — thanks, Natalie!) was the best part of the bagel. Despite the fact that they were mildly overdone, their crusty outsides and soft, peppery insides made them taste fantastic all on their own — no fancy additions, no toppings, just what they were. And that was good enough.
Debrief: I think I’ll try the other method of shaping the bagels (not posted) to see if they come out less chewy. And I’ll leave off the seeds, or use one of the other topping ideas offered by Beranbaum. I learned through this process that I don’t care too much for chewy bagels.
Levy’s Bagels
Courtesy of The Bread Bible
Makes five 4-by-1 1/2 inch-high bagels
Dough Starter (Sponge) Ingredients:
1/2 tsp instant yeast (I converted this to a little less than 2/3 tsp for active dry yeast, as Beranbaum suggests using 1.25 the weight of instant yeast if using active dry)
1 liquid cup plus 2 tbsp water, at room temperature (70 to 90 degrees F)
1 1/2 cups King Arthur high-gluten flour, preferably, or bread flour
1. Make the sponge: In a mixing bowl or the bowl of a stand mixer, place the yeast, water and flour. Whisk about 2 minutes, until very smooth; scrape down the sides. The sponge will be very thick. Cover the bowl with plastic wrap.
Flour Mixture Ingredients:
(Optional) 1 1/2 tbsp unsalted butter
1 cup plus about 3 tbsp King Arthur high-gluten flour, preferably, or bread flour
1/2 tsp instant yeast (or 2/3 tsp active dry yeast)
1/2 tbsp malt powder or barley malt syrup (I used malted milk powder because that’s all I could find, and it worked for me)
1/2 tbsp sugar
1/2 tbsp salt
1/2 tsp black pepper
2. Combine and add the ingredients for the flour mixture: In a medium bowl, whisk together 1 cup of the flour, the yeast, malt, sugar, salt and pepper. Sprinkle the mixture lightly over the sponge; do not stir. Cover with plastic wrap and let stand for 1 to 4 hours at room temperature, or, for the best flavor development, 1 hour at room temperature and then refrigerated overnight, or up to 24 hours. (During this time, the sponge will bubble through the flour mixture in places; this is fine.)
3. Mix the dough: Add the butter if using it (I didn’t) and all but 2 tablespoons of the remaining flour and mix with the dough hook, starting on low speed (#2 if using a KitchenAid), mix until all the flour is moistened, about 1 minute. Raise the speed to medium (#4 KitchenAid) and knead for 10 minutes if using high-gluten flour, 5 to 7 minutes if using bread flour, adding the remaining 2 tablespoons flour toward the end if the dough doesn’t pull away from the bowl. It should be very elastic and smooth and should jump back when pressed with a fingertip. Empty it onto the counter and knead in a little more flour if it is tacky (slightly sticky) to the touch. More flour will make a heavier, chewier bagel, which some prefer.
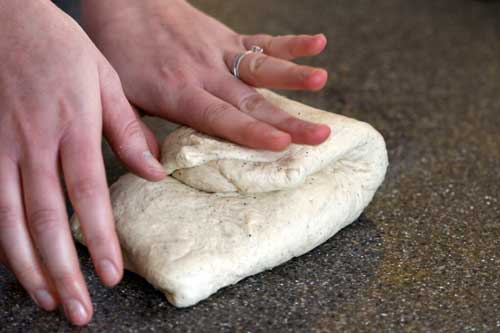
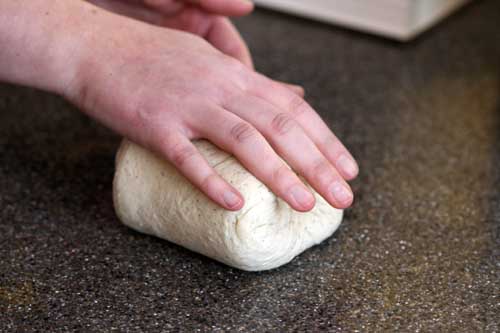
4. Let the dough rise: Place the dough in a 2-quart dough-rising container or bowl, lightly greased with cooking spray or oil. Press the dough down and lightly spray or oil the top. Cover the container with a lid or plastic wrap. With a piece of tape, mark the side of the container at approximately where double the height of the dough would be. Allow the dough to rise, ideally at 75 to 80 degrees F, or 1 to 2 hours until doubled (this part took about 3 hours for me, and even then it didn’t fully double… hmm). Deflate the dough by firmly pushing it down. Give it an envelope turn and set it back in the container. Oil the top of the dough, cover it, and refrigerate it for at least 4 hours, or overnight for the most flavor. (If you want to make the bagels later, at this point the dough can be wrapped and refrigerated for up to 2 days. Let the dough stand at room temperature for 30 minutes before shaping.)
5. Shape the dough and let it rise: Set a sheet of the parchment or lightly floured towel on a countertop near the stovetop. (Alternatively, line the baking sheet(s) with parchment or floured towels and place the shaped bagels on them so you can move them easily when you are ready to boil them.) Transfer the dough to an unfloured counter. Cut the dough into five equal pieces. Allow the dough to rest for about 10 minutes.
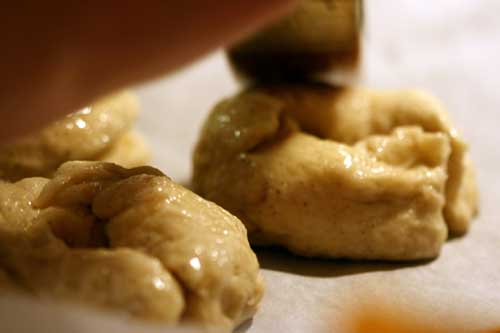
(There are two shaping methods here. For the sake of avoiding writing a novel, I’ll only post the method I used.) To develop slightly more chewiness, roll each piece of dough on an unfloured counter into a 12-inch-long rope. Make a ring, overlapping the ends by 2 inches and joining them by pressing down and rolling on the overlap until it is the same thickness as the rest of the dough ring. There will be a 1-inch hole in the center. This technique results in rounder, slightly higher bagels with smaller holes. Allow the bagels to rise for about 15 minutes or until they puff slightly.
6. Preheat the oven: Preheat the oven to 500 degrees F 30 minutes before baking. Have an oven shelf at the lowest level and place a baking stone or baking sheet on it before preheating.
Water Bath and Toppings Ingredients:
2 tbsp molasses or 1/4 cup sugar (I used sugar)
1 tsp baking soda
Glaze and Toppings Ingredients:
2 large egg whites
1 tsp cold water
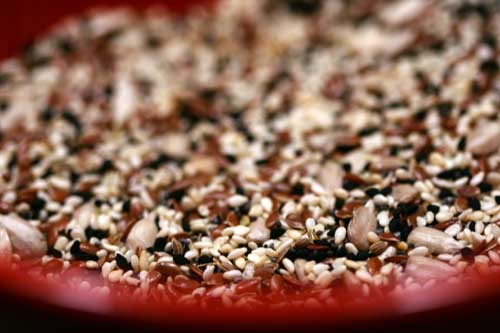
3 to 4 tbsp poppy, sesame or caraway seeds; kosher or sea salt; minced onions sauteed in vegetable oil; and/or dried garlic chips or dehydrated onions softened in hot water
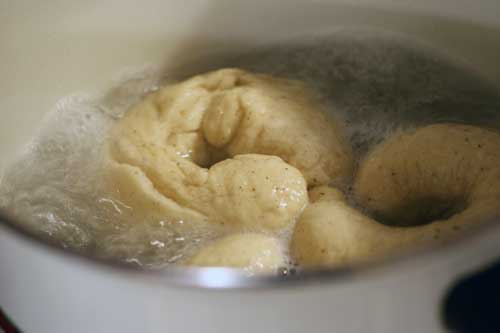
7. Boil the bagels: Bring a large pot (about 9-by-4-inches high) of water to a boil. Stir in the molasses or sugar and baking soda until dissolved. With a skimmer, transfer the bagels, one at a time, to the boiling water, without crowding them; cook them in batches of 2 to 3 at a time so that they can swim around without touching one another. If they are slightly underrisen, they may sink at first but will then rise to the surface. Boil for 30 seconds to 2 minutes on each side, gently flipping them over with the skimmer; the longer time will make a thicker crust. Remove the boiled bagels, shaking off excess water over the pot and set onto parchment or the unfloured towel to drain, then move them, using a pancake turner, to the prepared baking sheet(s) or peel, after just 30 seconds to 1 minute, so that they don’t stick. The bagels will look wrinkled at this stage. Don’t worry — their appearance vastly improves on baking.
8. Glaze the bagels: Whisk together the egg whites and cold water to break up the whites. Pass through a sieve into a bowl, and brush each bagel with the glaze. Do not let the glaze drip onto the baking sheet or peel, or it will glue them down. Brush with a second coat of glaze and, if desired, sprinkle any topping of your choice evenly over the bagels. (If you are using seeds, lift each bagel with a thin pancake turner or your hand, and, holding it over the pan with the seeds, sprinkle some more seeds on top. This way, you don’t have any seeds that would burn on the baking sheet.)
9. Bake the bagels: If using baking sheets, place one sheet directly on the hot oven stone or hot baking sheet. If using a peel, slight the bagels onto the hot stone. Bake for 5 minutes. Lower the temperature to 450 degrees F and bake for 20 minutes. Turn off the oven, without opening it and let the bagels remain for 5 minutes. Then open the oven door and leave the bagels in the oven for 5 more minutes.
10. Cool the bagels: Transfer the bagels to a wire rack and cool completely.
Extra punches: The bagels keep well for 1 day at room temperature in a paper bag. For longer storage, wrap each in plastic wrap, place in plastic freezer bags, and freeze for up to 1 month. Thaw, still unwrapped, at room temperature.
nice post. thanks.
Most excellent, dear! Wish I could have one 🙂
I love this recipe. But here’s your mistake with the bagels-coming-apart issue: Don’t shape them by making long sausages and then sticking the ends together into a ring. Instead, roll a ball of dough, and poke your fingers through the middle and stretch outwards, to make a full ring with no joined-up-ends. Problem solved.
mbb — thanks for your comment! I do remember the recipe giving two options for shaping the bagels, one of them being how you described. I guess I just chose the more finicky option at first. I’ll try your way next time!
Pingback: “Life, learned from bread” « KNOX-esque
I’ve made this recipe twice, and I’m in the process of a third attempt. It really is a ridiculous recipe. I generally start the sponge on Wednesday in order to bake the bagels on Saturday. Crazy. Anyways, I’ve tried both bagel shaping methods and I had the same problem as you with the two ends not sticking. Not really sure how to fix it, so I stick to the poke a hole in the ball of dough method.
I have made this three times. The first was okay, but the bottoms were burnt (my fault). The second time I moved up my stone to mid level. They turned out fantastic, so light, chewy, and tasty. The third time I forgot the second raise and fold. They turned out good, but not as good as before. I also used the roll and wrap way to form, i think it may help them rise better. Follow all the steps and they come out so much better than any bagel you can get in AZ. I am originally from Chicago and since I moved here, finding anything close to a real bagel is futile. I used regular bulk High Gluten flour from Sprouts, so good. My husband wants me to make a few batches for his next staff meeting. It is really very little work and a lot of waiting, but worth it!
Iv’e made these 5 times now. Each time better than the last. But I love chewy bagels (what I grew up with). The first 2 times, they came apart like this. The trick to getting the ends to stick is to roll them out to about 18in, overlap the ends the full width of your hand. When your roll to connect the ends… Start by pressing down on with the left side of your hand and as you roll, shift the pressure to the right side and back and forth. I do this for about 10 seconds per bagel.
Adam — Good to know; thanks so much for the tip! I’ll keep that in mind next time I make them.
Definitely a labor of love these bagels. I found the recipe in the “Bread Bible” I had never heard of adding Malt powder to a bagel recipe. I had the hardest time finding Malt powder (not to be confused with Malted Milk Powder), the two are ENTIRELY different. I was able to find the Malt syrup at my local health foods market. This recipe does not use milk of any kind, therefore the “Malted Milk” made by Carnation (found in the dry milk area of a market) should not ever be used instead.
I love the recipe, but we cut way back on the pepper and omitted the molassas in the water. Made the bagles look like pumpernickle and my kids wouldn’t touch them. Other than that they were yummy,