crock pot peasant bread

This bread had high hopes. We both did, really. In my continuing quest to find The Perfect Bread for the Laziest Girl Ever, when I happened upon a recipe for bread baked in a crock pot, I thought my days of searching were over. “This is it!” I thought. “I can make bread without lifting a finger!” I said to myself. “I can watch TV and paint my nails and take a nap on the floor with my cat and this bread will just bake itself!” I exclaimed. (OK, that last one is a bit of an exaggeration. Though I do take naps with my cat.)*
As I was saying — this bread recipe looked promising. I love my Artisan Bread in Five Minutes a Day cookbook like it was my own not-yet-existent child. The recipes are tried and true, ridiculously easy to make and honestly scrumptious. It really is the lazy girl’s (or guy’s) guide to bread baking. So I shouldn’t have been surprised that a recipe requiring even less effort didn’t turn out quite as well in the visual department. The taste is another story.

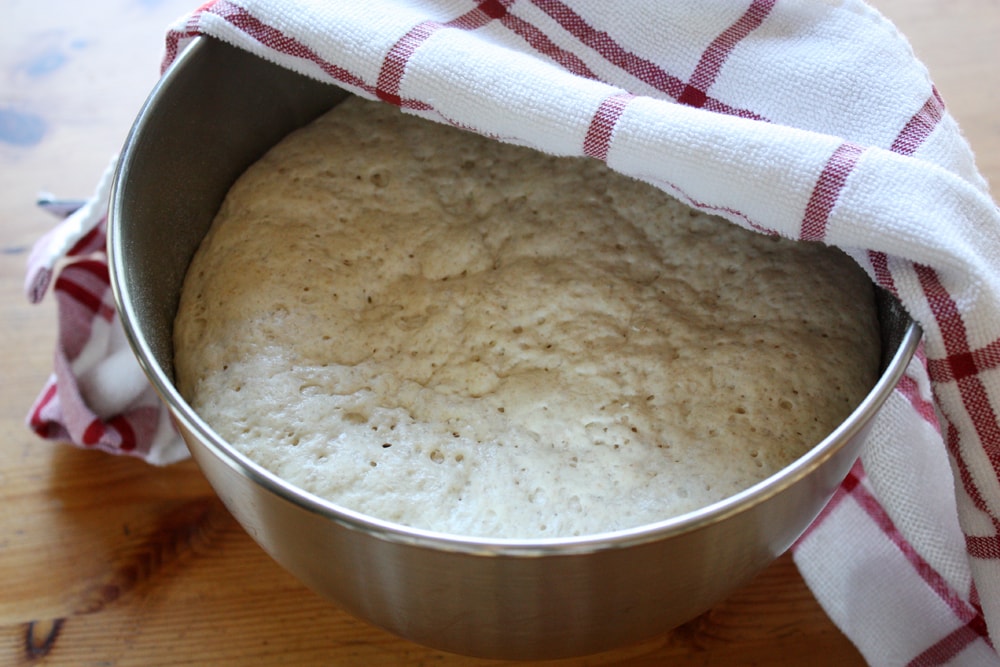
Let’s start from the beginning. I did everything as I was supposed to. I mixed the yeast, water and salt together. I add the dry ingredients and stirred with my dough hook until everything was just incorporated. I covered the dough and let it rise for a couple hours.
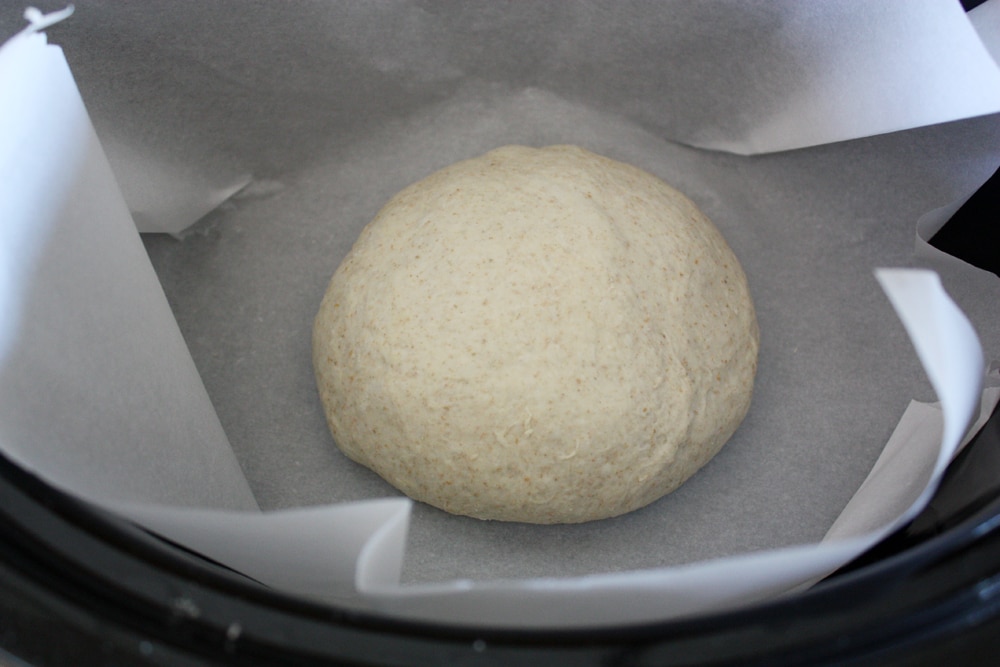
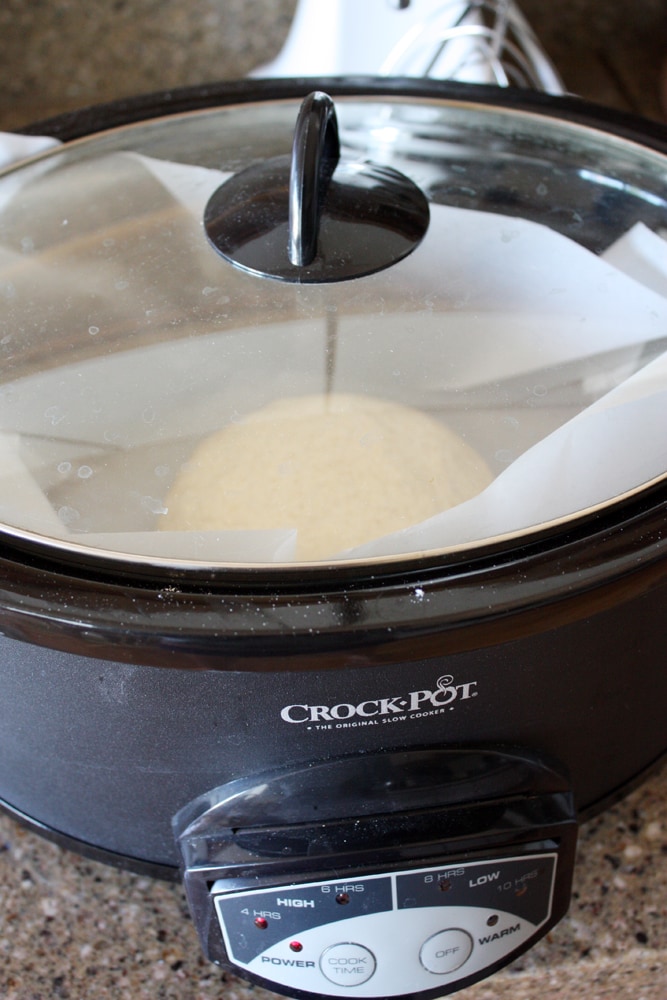
I divided the dough into loaves (one to bake as per the book recipe, a.k.a. sans crock pot; the other for the crock pot) and shaped them into balls using the gluten cloak method (the act of adding a bit of flour to the top of the loaf as you quickly shape it into a ball with a taut round top). I placed the dough in my parchment paper lined crock pot, covered it and turned the heat to the highest setting. Then, I waited.
First, I waited an hour. By this time, I’d already let the other dough rise, placed it in the oven and started baking it. By the time the oven-baked loaf was done (about half an hour in the oven), the crock pot loaf had juuuuust started to brown on the sides, but the top was still gummy and underbaked. So I kept waiting. And waiting.
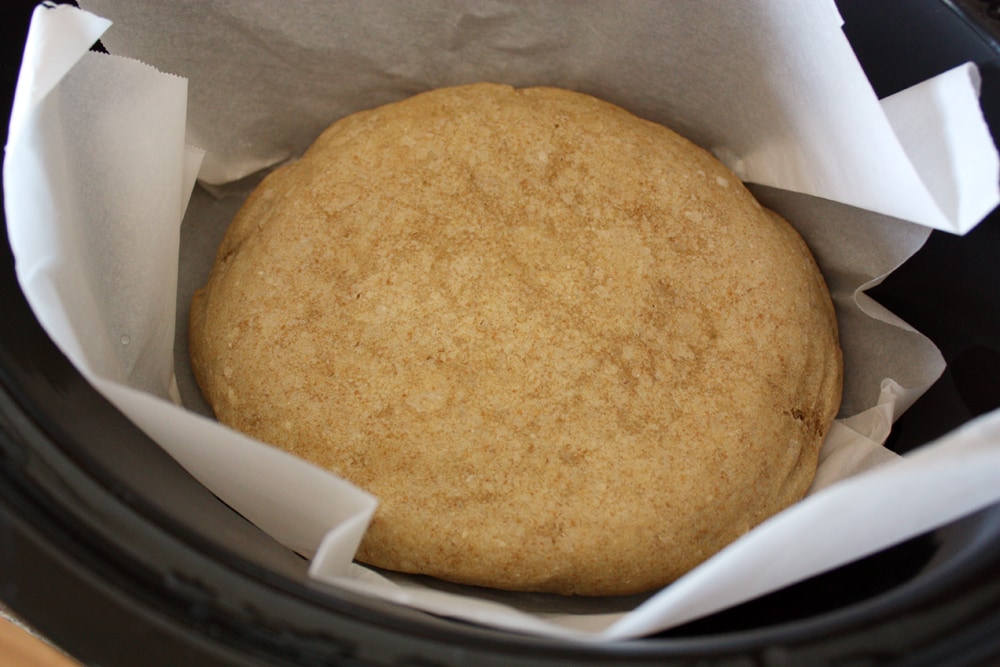
Finally, two hours later, the loaf was browned on the bottom and sides and the top was firm with a little give (but not mushy). It was also… well, like this. Flat. Flat like a flying saucer. But I didn’t give up!
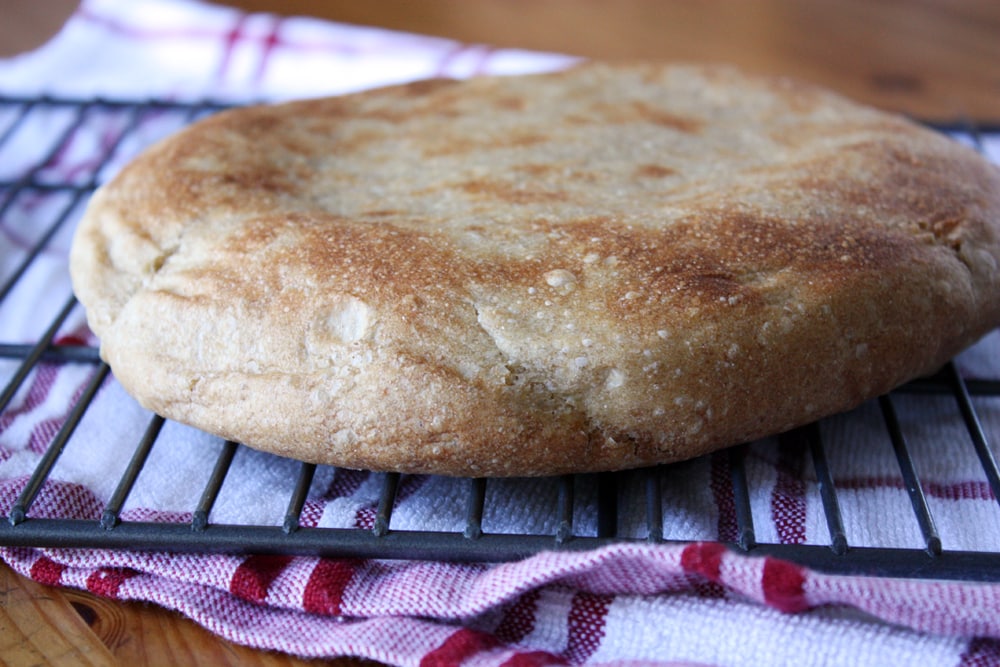
I placed the loaf under the broiler for a few minutes to brown the top so it looked a teensy less ugly, then let it cool completely before slicing.
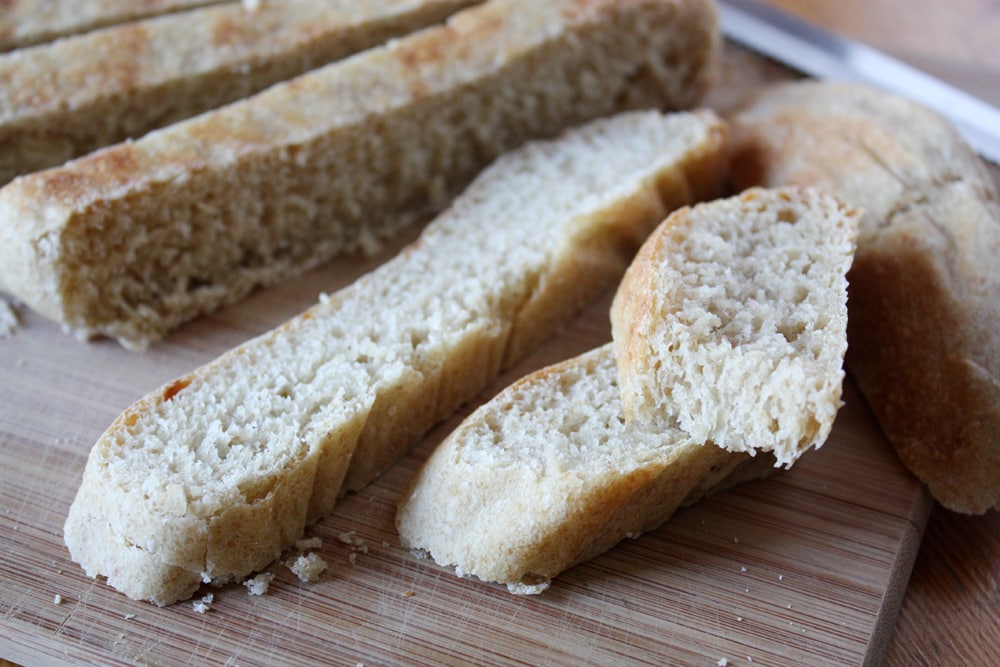
The result? Delicious, delicious, ugly-looking bread. Pros: It rendered a dense crumb and a lightly chewy crust, and the flavor was rustic and mild. Cons: It’s ugly. There’s no way around that. And for a perfectionist like me, I’d have a hard time serving this bread with pride because it’s so dang… well, you know. And while I was able to skip the second rise on the loaf, the long baking time overrode any time I could have saved.
Obviously there are many things that probably went wrong with this recipe. I might not have added enough flour to the original mix, I might have not achieved the best gluten cloak and my crock pot might just not get hot enough, quick enough. I also had to lift the lid a few times to check the bottom of the bread for doneness, which I’m pretty sure aided in the flattening of the top of the loaf (not sure how to fix that part, though, because you have to check the bread). Also, I’m not a pro, so there’s that. But I’d say if you’re going the uber-lazy route and you just want to bake a bread for the taste alone without having to do any heavy-lifting at all, this is a pretty reliable recipe. For me, though, it’s better to use a little more effort to bake my bread in the oven.
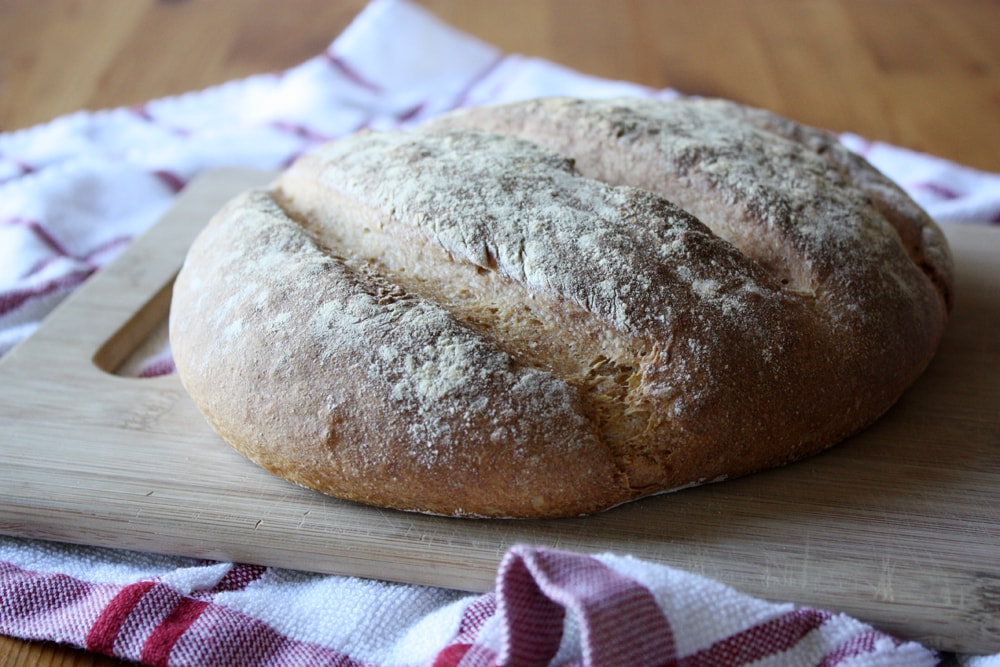
This is the oven-baked version, by the way. Yeah. You smell what I’m steppin’ in.
*Would that be considered the ultimate “cat nap”? I’ll stop talking now.
European Peasant Bread, baked two ways
Adapted from Artisan Bread in Five Minutes a Day
Yields: 2 free-form loaves
Ingredients:
1 1/2 cups lukewarm water (about 110 degrees F)
2 1/4 teaspoons (1 packet) active dry yeast
2 1/4 teaspoons salt
1/4 cup dark rye flour
1/4 cup whole wheat flour
2 3/4 cups unbleached all-purpose flour, plus more for dusting and shaping
Directions:
In a large bowl or bowl of a stand mixer fitted with dough hook attachment, whisk together water, yeast and salt until yeast is dissolved.
Add flours and stir until just combined (do not knead). Cover bowl with a towel and let rise until dough rises and flattens, about 2 hours.
Punch down risen dough and divide into 2 equal pieces on a lightly floured surface.
To make Crock Pot Peasant Bread: Dust top of loaf lightly with flour, then pick up with hands and quickly shape into a ball by stretching the surface of the dough as you turn it. Place ball in the center of a parchment paper lined crock pot (mine is a 5.5-quart oval). Turn heat to the highest setting, cover crock pot and let bake until dough is browned and firm on the bottom and firm to the touch (not mushy or too soft) on the top, anywhere from 1-2 hours. NOTE: Try your bestest to not lift the lid until you’re pretty sure the bread is done (I know, easier said than done) or you risk the dome top collapsing, thereby resulting in the flying saucer bread. Remove bread from crock pot and place under broiler for a few minutes until top is golden brown. Remove and place on a cooling rack to cool completely before slicing.
To make oven-baked Peasant Bread: Dust top of loaf lightly with flour, then pick up with hands and quickly shape into a ball by stretching the surface of the dough as you turn it. Place ball on a lightly floured baking stone or sheet and let rest 40 minutes. Preheat oven to 450 degrees F and place an empty broiler tray on lower shelf. When dough is rested, dust liberally with flour and use a serrated bread knife to make a few slashes in the top of the dough. Place dough on baking stone or sheet in oven. Pour 1 cup hot water into empty broiler tray and close oven door quickly. Bake loaf until golden brown and firm, about 30-35 minutes. Remove dough from oven and cool completely on a cooling rack before slicing.
I am pro-ugly food (except when I’m trying to take blog photos). At bake sales, it’s the ugly cupcakes that are homemade, and, inevitably, beautifully frosted bakery cupcakes always disappoint.
Both your pretty and your ugly bread look great!
Kate — Thank you so much! I agree; sometimes the best-tasting recipes aren’t the prettiest. Thanks for the comment 🙂
The crockpot version reminds me of ciabatta in a way … I don’t think it looks THAT ugly. 🙂 At least the taste did not disappoint!
P.S. Have I mentioned how much I appreciate the in-progress pics? Thanks for the details!
Pam — You’re right, it does sort of look like ciabatta! 🙂 And you’re welcome for the details: I’m so glad they’re helpful!
Beauty is the eye of the beholder coz this looks AMAZING to me. I have just about given up on baking bread as I have had too many time-consuming disasters but I love reading about everyone else’s baking 🙂
Hungry Mum — Thank you!
I bet it would make spectacular croutons, though.
Not Supermom — Yes, yes it would. 🙂
I just tried this a week or two ago. My bread was just as ugly as yours, but not quite as flat. I really think it was the ugliest bread I’ve ever made. Or second ugliest.
Pingback: CROCK IT UP: FAVORITE SLOW COOKER RECIPES | Best Friends For Frosting
ugly or not it would be perfect for soup, stew or chili!!!
Not ugly at all. It’s rustic.